Expand Back Attack To Improve At The Rack: Advanced Enhancements to a Great Finishing Drill
Last week we discussed why you should use Back Attack to teach your players finishing. It's a fun, competitive, and adaptable drill.
Today, let's discuss some add-ons to the drill. While using it as described in the first article is a great start, there are a number of ways to enhance the drill. Let's dive in.
Ways To Enhance Back Attack
Before we expand beyond 1v1, here's a couple of ways to change the emphasis of the original drill.
-
Play it through the rebound - many finishing drills are one shot. If the offense scores, they get a point. Or they get to stay on offense. This puts pressure on the offensive player. That's a good thing.
But there are other ways to do it. One option is to play through the rebound. If your team struggles with rebounding, this is a must.
When you focus on rebounding, you probably prioritize boxing out non-shooters. However, boxing out shooters after contesting at the rim is challenging.
Oftentimes, the offensive player's body is going towards the rim. The defender is backing up. This can result in the defender drifting under the rim, allowing the shooter to rebound their own shot.
Playing this drill through the rebound forces the defender to work on that. You might also add an offensive rebound constraint. For instance, you could say that on an offensive rebound, the offensive player must score without dribbling. This will force them to work on using pivots and fakes to find a window to score.
To get FREE 10 Small-Sided Games For Player Development, click the banner below

-
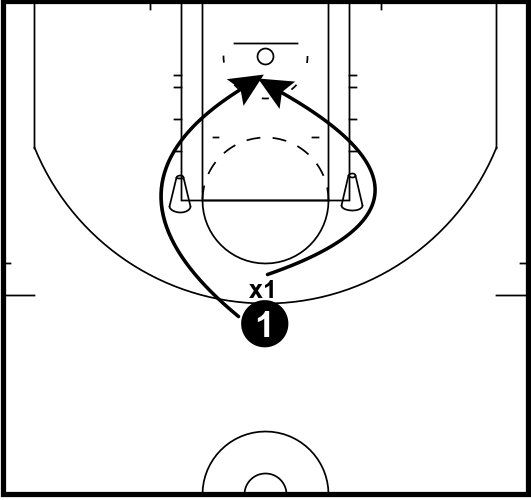
Change the defensive recovery angle - we talked last time about attacking from different angles. This is a little different. In a game, you won't always be right on the body of your defender when you drive.
Sometimes, you and the defender meet at the rim. That creates a different situation. It's important to practice.
To do so, put a cone on each elbow. From there, you can do a couple different things.
Let the offense go first and dribble around one cone. The defender must run around the other cone. The offense then attempts to finish at the rim. This way gives the offense the biggest advantage.
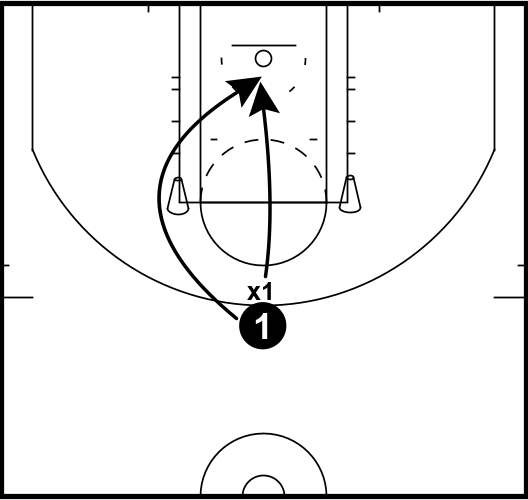
Once the offense is succeeding under those rules, set up the exact same way. This time, let the defense go first. This makes it more likely the defender will be at the rim when the offensive player arrives, forcing a tougher finish.
-
Allow the defender to run straight to the rim - this is another way to make it harder for the offense.
Add a 2nd defender at the rim - good finishers score often in this drill. The drill creates enough of an advantage that skilled offensive players should score the majority of the time.
Adding a second defender at the rim can level the playing field. More importantly, it forces the offensive player to address a common problem - the help defender coming across to contest.
To do this, put a second defender at the rim. The drill starts exactly the same. When the offense starts to attack, the defender must take 2 steps in the opposite direction of the drive. They do this as quickly as possible before coming across to defend.
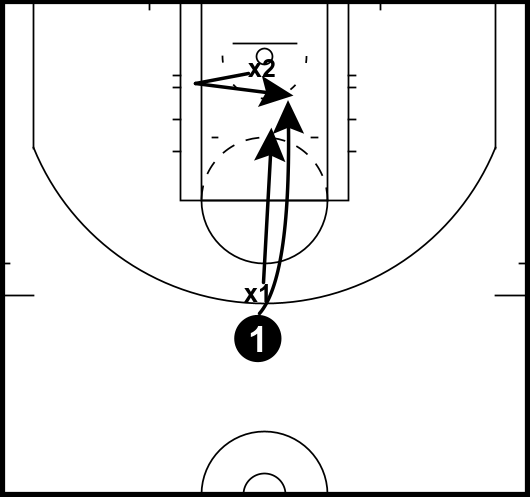
In this situation, the offensive player must read the help. A good teaching point is to try to make it 1v1. To do that, the driver must veer away from their defender (get in front of them). That removes them from the play and makes it 1v1 against the rim defender.
If they are unable to do that, they must find another way to score. This could be using a floater, push shot, euro step, or back pivot. It forces the offense to work on different finishes while avoiding charges at the rim.
If you're doing this competitively, tell the help defender they win the drill if they take a charge. That's a way to incentivize good defense.
-
Add players - One limitation of the original drill is that it doesn't provide a passing option. If you're like me, you've coached players who go to the rim with blinders. It doesn't matter how many defenders they attract, they are shooting!
What they fail to realize is that they did their job when they attracted extra defenders. From there, they need to make simple reads.
One read could be: if you see a chest, pass. If you see a shoulder, score.
Another could be: pass where the help comes from.
A third would be: early help, early pass; late help, late pass.
All are helpful guidelines. Adding players to back attack is a great way to work on them.
The easiest reads will be in 2v2. You can position the second player where you want. One idea would be to put them under the rim. On the drive, they slide opposite (as many offenses teach) and look to shape up to the ball for a pass.
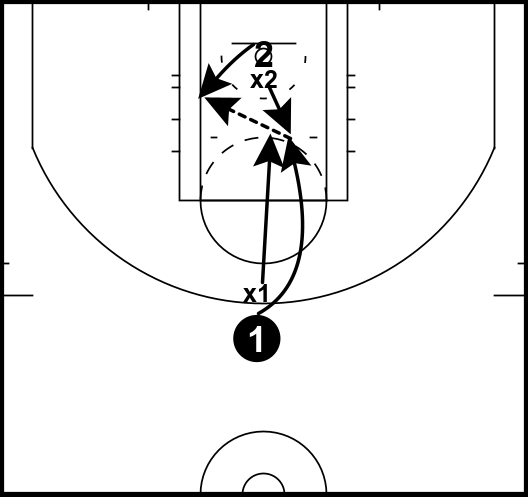
The driver should always drive to score. If the defender helps, they look to pass.
In 2v2, give the offense one pass.
You can continue to add players until you are in 5v5. This increases the difficulty of the offensive player's decision. There are now more players to read. It also makes the drill more game-like.
Lastly, you can mix up where you start the ball. Incorporate all the different spacing spots in your offense.
The offensive players without the ball can work on their penetration reaction. This might involve things like circle movement, 45 cuts or baseline drifts. It's important players can read the ball and get to proper spacing quickly.
It is also a great defensive drill. A big part of defense is knowing when to help and when not to help. In this drill, the help defenders must read if their teammate needs help. Communication is essential.
If you do this 4v4 or 5v5, you will put your defense in scramble situations. That's great practice. The offense attempts to maintain the advantage while the defense seeks to neutralize it.
Play in the half court or start a 3 or 5 possession scrimmage this way.
Conclusion
Back attack is a great platform drill. Platform drills are drills you use frequently that can be adjusted to emphasize certain things.
At the beginning of part 1, we discussed how back attack is a great way to teach finishing. Since then, we've discussed how it can also help work on recovery defense, help defense, defensive communication as well as penetration reaction and pass/shot decisions.
That's an impressive list! Make sure to incorporate this drill into your rotation to make all your players better!
Related Resources
Sanderson Game-Based Training System
Next Level Finishing Moves with Jim Huber
To get FREE 10 Small-Sided Games For Player Development, click the banner below
What do you think? Let us know by leaving your comments, suggestions, and questions...
|
|||


 Facebook (145k Followers)
 YouTube (152k Subscribers)
 Twitter (33k Followers)
 Q&A Forum
 Podcasts