Four End Of Game Plays For The Stretch Run
2 Full Court, 1 BLOB, 1 SLOB
As the season winds down, everything takes on more significance.If your program is doing things right, the sense of urgency grows this time of year.
Every practice matters more. Every game matters more. And every possession matters more. Before long, you'll be in a survive and advance situation.
Your team must be prepared for the situations they'll face. With that in mind, consider adding these four complementary end of game plays to your playbook.
In this article, we're going to cover:
- 2 DHO Full Court End of Game Plays
- Use This "Special" BLOB In A Short Clock Situation
- "Wizard" SLOB With Multiple Scoring Options
2 DHO Full Court End of Game Plays
First, let's cover why these two end of game plays work great in tandem...
The great thing about these plays is that they start exactly the same. That serves a few purposes.
First, it makes it easier for your players to learn. The formations are identical. Only a couple things change.
Second, it makes it harder for your opponent. If you run Eagle 1 early in a game, you can catch your opponent sleeping with Eagle 2 later.
Third, each play has an option for both 2 and 3 point shots, depending on what your team needs.
These plays can be run in 8 to 12 seconds left at the end of a quarter or end of game situation.
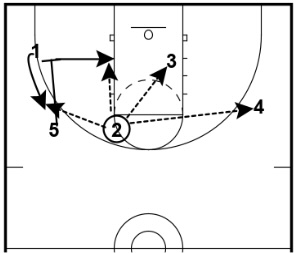
Eagle 1 - DHO > Ball Screen > Flare
When you run these plays, it's important to have your players positioned correctly.
1 should be your point guard.
2 should be your best playmaker.
4 should be one of your best shooters.
5 should be your post or biggest player.
3 can be any type of player and is the spot for a non-scorer.
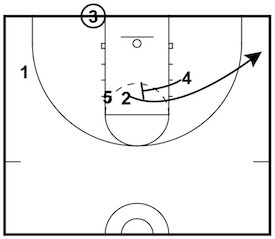
To start, 1 cuts to receive the ball on the run going up the left side of the floor.
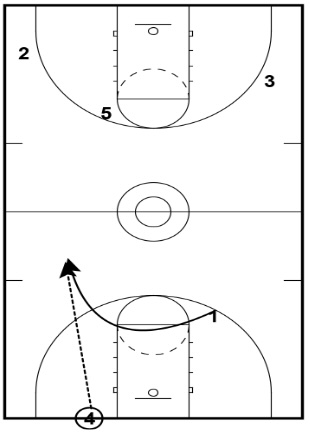
1 dribbles into a pitch or handoff with 2, who is blasting up out of the corner. 1 should try to dribble at 2's defender to open space.
5 comes right behind 1 and prepares to screen for 2
On the other side of the floor, 4 sprints up court and towards the opposite slot.
1 clears to the corner after making the pitch to 2.
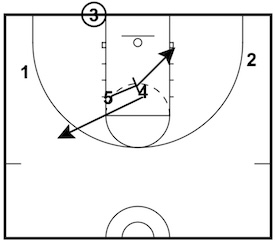
After receiving the pitch, 2 comes off 5's ball screen. It's important 5 set the screen slightly angled towards the basket so 2's defender cannot go under the screen.
2's first look is to attack! They must be thinking score.
On the weak side, 3 sets a flare screen for 4. 4 will often be open as their defender will look to help on 2's drive. After the screen, 3 slips to the rim.
Here's where you have options:
If you are looking for a two-point shot, have 5 roll after their ball screen. If their defender switches onto 2, you will likely have a mismatch you can exploit at the rim.
1 can then fill back up behind the roll. If their defender helps, they will be open for a three-pointer.
If you're looking for a 3, have 5 down screen for 1 after the ball screen. 1's defender is likely to relax after the handoff, leaving them vulnerable.
This action will often result in 1 being open for a wing 3.
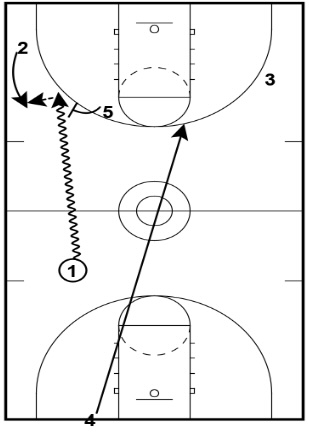
Eagle 2 - Fake DHO > Flare
Eagle 2 starts exactly the same way as Eagle 1.
It is best run after you've run Eagle 1 or if your opponent has seen you run Eagle 1 on film.
If they are expecting Eagle 1, Eagle 2 is a great counter that also offers multiple scoring options.

Just as in Eagle 1, 1 drives it hard towards 2, who is sprinting up out of the corner.
5 moves towards the wing to prepare for their screen.
However, instead of pitching it to 2, 1 fakes the pitch. It's important that 1 hesitate slightly. They may even execute a half spin to sell that they are flipping the ball.
After the fake, 1 accelerates towards the rim. The first option (if you don't need a three) is 1 scoring at the rim.
On the weak side, 3 again screens for 4. This time it's a hammer screen for 4 filling the opposite corner.
This is a great option for a 3. If 3's defender helps on 1's drive, there is no help when 3 screens 4's defender.
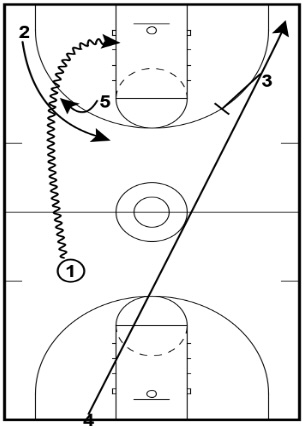
The last action in this play is a good one. 2 has already run past 5 after the fake pitch. Generally their defender relaxes.
2 slams on the brakes and comes back towards where they started. If 1 can't score or pass to 4 or 3, 1 can back pivot and look to 2 filling behind them for a three-pointer. After their screen, 5 dives to the rim.
Eagle 1 & 2 are great end of game plays.
Both make all 5 players scoring options.
Both make the defense guard multiple actions.
Both look similar.
Those three aspects optimize your chances of getting a good shot. And remember, the key to players executing last-second plays is practicing them and being confident they can execute them come game time.
Consider adding these to your playbook to give your team options when you need a late-game bucket!
Use This "Special" BLOB In A Short Clock Situation
Our team recently found itself in a baseline out of bounds situation with 1 second left in the half.
I've been in a number of those situations throughout my career. I've tried a number of different plays to get a good shot.
I've tried lobs. I've tried backdoor or curl cuts to the rim. At times, they have worked. But I've found that a lot of teams are expecting something at the rim in a situation like this.
We also do have a lob threat this year. So when we found ourselves in this situation, I was reminded of a play I saw taught by former NBA coach Mike Fratello.
This is a great play for a short clock situation when you need a 3. Let's check it out.
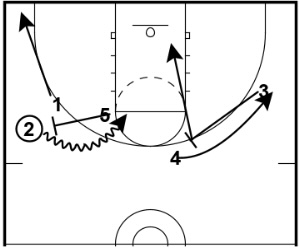
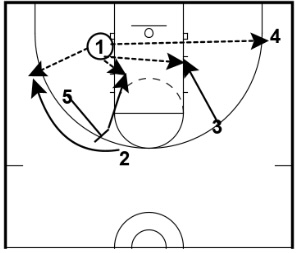
Special BLOB
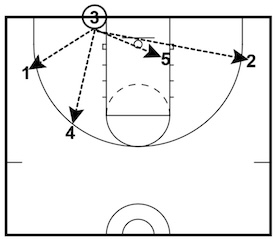
The play begins with 1 and 2 stationed at the free throw line. The two players should be two of your best shooters.
4 and 5 are stationed a little below the man outside the blocks. It's important they are lower than 1 and 2 so that when they screen, their defenders cannot slide under the screen.
4 should also be a good shooter and 5 can be your post player.
2 sprints past 1 as though coming off a stagger screen. However, after passing 1, 2 curls and instead screens for 1. 1 then comes off a stagger screen from 2 and 5. This is the first look.
4 then comes in from the weak side and screens for 2. 2 sprints to the weak side corner for a 3 point option.
This is often open as teams focus on the ball side.
After setting the screen for 2, 4 receives a screen from 5. 4 sprints to the ball side wing as a third 3 point option.
5 then slips to the basket after setting their screen.
As you can see, this play gives the inbounder 4 realistic options to pass to. Most out of bounds play do not make all 4 players threats. This one does.
The only exception would be if you need 3 points, 5 would not be an option.
For that reason, it's important to have a good inbounder who can read how the defense is playing and see what's open.
If you want to see how we ran it, check out the video below.
As you can see, our inbounder made a great read and this 2 in the weak side corner. We never got to the last option because of this pass.
If you are looking for a late game BLOB, Special is a great one to try!
"Wizard" End Of Game SLOB With Multiple Scoring Options
Sideline out of bounds situations can be tough. Passing angles are hard. This is especially true when the opponent puts a taller player on the ball.
Wizard is effective because you can use it for a two or three point shot. It also creates multiple passing windows to help your inbounder.
Try Wizard to give your team multiple options to score.
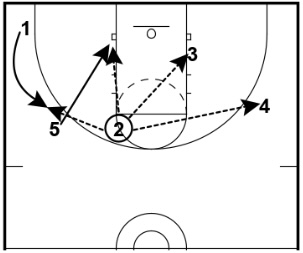
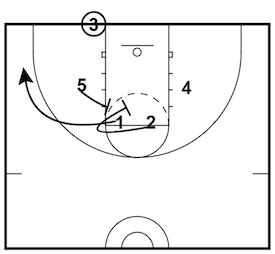
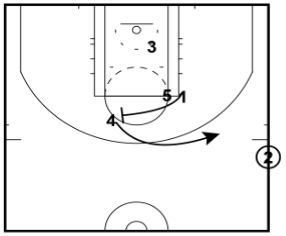
Wizard
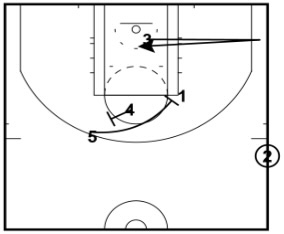
This play has multiple options. For that reason, you have flexibility in which spot you put your players. You might put your best player as the 3. If the defense tries to deny them, this first option may be open.
As soon as the inbounder receives the ball, 3 cuts violently to the corner and calls for the ball. 2 pass fakes to 3. 3 makes a hard back door cut to the basket.
The basket area is vacant because of the positioning of the other three players. This is the first option.
While the back cut is going on, 4 screens for 5, who immediately sprints into a screen for 1.
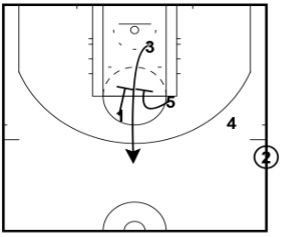
After receiving the screen from 5, 1 sprints into a screen for 4. The multiple screens occurring up top often confuse the defense.
4 coming off the screen from 1 for a shot is the second option.
The third option is an elevator screen for 3. 3 runs in between 1 and 5, who come together immediately after 3 passes between them.
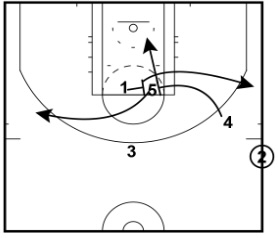
One final screen the screener action gives you more options.
1 turns and sets a flare screen for 5. This can be a challenging pass, but the defense often neglects the weak side.
If so, have 2 look for the skip pass over the top to 5 on the opposite wing.
4, who didn't get the pass earlier, comes in and screens for 1. 1 comes to the ball side wing for a shot opportunity.
Finally, after sitting their screen, 4 slips to the rim. This presents a lob option.
As you can see, Wizard presents a ton of options. One key coaching point is to teach your inbounder to be patient and poised.
Five seconds is a long time. To maximize that time, your players must go as soon as the ref hands the ball to the inbounder.
Additionally, your inbounder must be willing to let the play develop. Counting to themselves can help with this.
If you run this with pace and precision, you will get an open shot.
Make sure to run it in practice to give your players confidence. That way, when the situation arises, they'll be ready to shine, and so will you!
We hope you enjoyed these End of Clock plays!
We'd love to hear your feedback and questions below... even if it just means you liked the plays.
What do you think? Let us know by leaving your comments, suggestions, and questions...
|
|||||


 Facebook (76k Likes)
 YouTube (85k Subscribers)
 Twitter (26k Followers)
 Q&A Forum
 Podcasts